How to Make a Lumen Print
No camera required
Essentially, a lumen print is an image produced on photographic paper using the sun as a light source.
The technique dates back to 1834 when William Henry Fox Talbot, an English scientist and inventor, discovered that writing paper, coated with salt and treated with a silver nitrate solution, would darken when exposed to sunlight.
He placed plant cuttings between a pane of glass and a sheet of the light sensitive paper and set it down in direct sunlight. He found that the paper darkened except for the areas covered by the plant cutting, rendering an accurate tracing of the plant on to the paper. He called his discovery a photogenic drawing.
Today, we can use this same technique to produce lumen prints with readily available products.
The items you will need to make a print:
Black and white photographic paper.
Note: this is not the kind of paper used for inkjet printing. A quick Google search will help you find a number of stores that sell photographic supplies, including paper. You can even use expired paper and get good results, as long as the paper has never been exposed to light. Any exposure to light (other than a safelight) will ruin the paper. I suggest starting with 8" x 10" paper, it's a common size and not too expensive. There are many different types of paper available and they will all produce different results. Buy paper in small quantities and experiment. Personally, I like warm toned fibre based paper but it's not as easy to work with as resin coated (RC) paper.
A safelight globe.
You can buy an LED safelight globe and plug it into a standard light fitting or lamp. You really only need the safelight when taking a sheet of paper from its packaging - to prevent the rest of the paper from being exposed. You could skip the safelight and carefully take a sheet of paper from the packaging under a heavy cloth or something. The important bit is to protect your unused paper from any light.
A sheet of glass and backing board.
Pick up a couple of photo/certificate frames from one of those cheap variety stores (the Reject Shop for example). Use the glass and backing board and toss the frame. Make sure the set you buy is at least one size larger than the paper you will use.
A bottle of fixer.
The place where you buy your paper will probably also sell fixer. It doesn't matter which brand or type you buy, they all do the same thing - make your image permanent. Once your paper is treated with fixer it will no longer be sensitive to light, without it your image will disappear.
A 1 litre measuring jug.
This is just for mixing the fixer solution. Follow the directions on the fixer bottle, it's usually 200ml of fixer plus 800ml of water or thereabouts.
Two trays.
The trays need to be large enough to contain your paper laid flat. Plastic trays specifically for photographic paper are the best to use as they have ridges on the bottom to make removing paper easier. Any cheap tray that will hold 1l of solution will do though. One is for the fixer, the other is for washing the print.
Other stuff.
Masking tape, bulldog style clips or clothes pegs, tongs, rubber gloves, running water, somewhere to hang your prints to dry.

Some items you will need
Once you have the items needed it's time to start having fun.
You are not limited to making prints from plant cuttings but, plant cuttings, leaves, and flowers are a good place to start. Look for cuttings that will lay fairly flat and are small enough to fit onto the paper.
Your photographic paper will be inside a light-proof, black envelope in a cardboard box. Always protect your unused paper from exposure to any light other than the safelight.
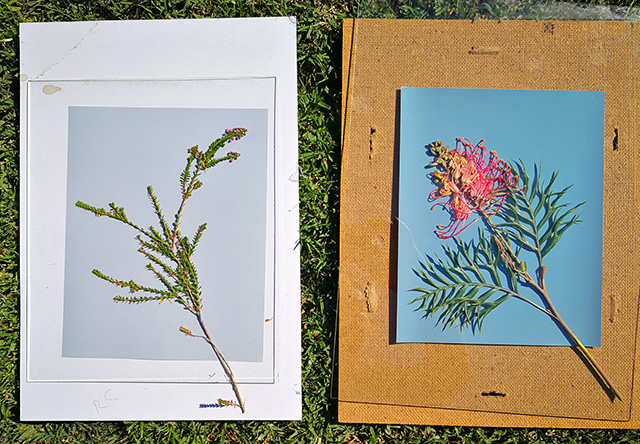
Under the safelight, or in total darkness, remove a sheet of the paper and place it, emulsion side up (smooth side up), on your backing board.
In very subdued light:
Arrange your cutting/leaf/flower on the paper.
Cover everything with the glass. You may want to use some masking tape to hold the glass in place. Make sure the masking tape does not cover any of the paper.
Carry everything outside and place it in the sun.
You don't need direct bright sunlight. The process will still work fine on cloudy days or in the shade, you may need to extend the exposure time to compensate though. Generally the brighter the day the less time is needed.
Check the paper from time to time. Once you think the paper is sufficiently dark it is done. There is no hard and fast rule for exposure time, anywhere between one hour and up to four hours is quite normal.
Shortly before you think the print is ready, prepare the fixer solution and pour it into a tray. Set up a space near access to running water - your laundry, bathroom, or kitchen are likely to be good spots. Place the wash tray into a bathtub, laundry trough, or sink. Water is going to overflow continuously from the wash tray.
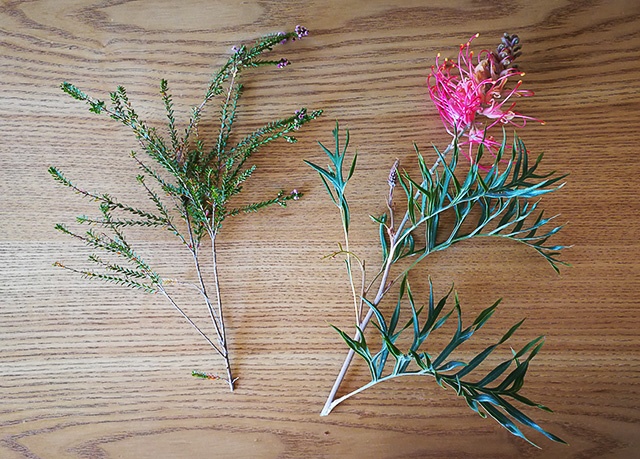
A couple of cuttings to print
Remove the plant material from the paper and give the paper a rinse under running water.
Put the paper into the fixer solution making sure that it is completely covered by the solution. Gently and continuously rock the tray so that the fixer solution is constantly moving over the paper. The fixing time may vary depending on the brand/type of product. For rapid fixer it could be a short as two minutes, for other types, up to five minutes. It's better to fix the paper for slightly too long than not long enough.
Fixer can be saved and re-used several times if it's kept in an air-tight container.
After fixing, rinse the paper under running water then place the paper into your wash tray and let water run into the tray so that it gently overflows.
RC paper should be washed for at least ten minutes; fibre paper at least thirty minutes.
After washing, hang the paper to dry overnight. Fibre based paper will curl up significantly as it dries so you will need to find a way to flatten the paper - a few days between a couple of heavy books should do the trick.
Letting the sun do its work

Drying prints, RC paper on the left, fibre on the right

A completed print of a camelia leaf on RC paper.
Try experimenting with:
- Different types of paper.
- Vary the exposure time and directness of sunlight. Try partial shade, try shading part of the image.
- Try printing different things. You can print all kinds of organic matter - as long as you can keep it fairly flat. You can also print shapes from non-organic matter, lace cut-outs are quite popular as one example.
- Try different compositions. I tend to like simple compositions but there is no reason not to try things like scattering seeds over your print or add a slice of bacon. Have fun with it!
Recent Articles


Subscribe