Exposure - Part 1: Forget the Exposure Triangle
The exposure triangle is bollocks
You have probably heard of the exposure triangle and you've probably heard that understanding it is fundamental to understanding photography, right? Wrong.
The exposure triangle is supposed to be a kind of mnemonic device to help new photographers learn about correct exposure. Triangles have three sides, there are three aspects to determining exposure (ISO, shutter speed, aperture) - that is all that triangles and photography have in common. The exposure triangle was originally thought of as a way of teaching people how to use light meters, not cameras - it was just as wrong then as it is now.
Thinking about the variables that create correct exposure in terms of a three-sided geometric shape is misleading. It suggests that each aspect has equal value and that is not the case. In fact, ISO should not be thought of in the same terms as shutter speed and aperture. ISO plays no part in the creative aspects of making a photo and should not be considered as part of the photo's exposure. If we removed ISO we would be left with a two-sided triangle and two-sided triangles are just bad triangles!
Understanding exposure is possibly the most important initial skill in learning photography. Spend some time to make sure that you understand the workings of ISO, shutter speed, and aperture individually.
Achieving correct exposure is about getting the appropriate amount of light through the lens and on to the photo sensitive material inside your camera - whether that material is film, or glass, or tin, or paper, or a digital sensor, or whatever. Too much light and the photo will be over exposed (too light/washed out), not enough light and your picture will be under exposed (too dark/muddy shadows).
Understanding how to calculate the correct amount of light for the image you want to produce is the important bit.
To make a simple analogy, think of light as if it were water. Imagine that you have a bathtub full of water and in the bath you have an empty bucket (it's a heavy bucket, that's why it isn't floating). If you were to poke a hole in the side of the bucket some water from the bath would pour in. Now, block that hole with your finger and stop the flow of water. Your finger is acting as a shutter, the longer you leave the hole open the more water enters the bucket. If you left the hole open for one second a certain amount of water would pass through it; if you opened the hole for two seconds then double the amount of water would pour into the bucket.
The size of the hole is the aperture. Obviously, a bigger hole will let more water through. If you doubled the size of the hole then you would only need to leave it open half as long for the same amount of water to enter the bucket. This is called the Law of Reciprocity. Reciprocity: an increase of brightness by a certain factor (controlled by the aperture) is exactly compensated by a decrease of exposure time by the same factor.
We can control the amount of water entering the bucket by adjusting one of the two variables: the size of the opening through which the water passes and the amount of time the hole is left open.
Let's get out of the bath and back to photography and light... the slower your shutter speed (the longer the shutter is open) the more light enters the lens, the larger the aperture (smaller f-number) the more light enters the lens.
One more thing you need to know before we move on... we refer to the amount of light in "stops". Doubling the amount of light (by halving the shutter speed or doubling the aperture) is increasing the amount of light by one stop.
And, in the interest of full disclosure, until around five years ago I admit, even though I was never comfortable with the concept, I used to teach the exposure triangle. One day I realised that I was just propagating nonsense and decided the best way forward was to stop muddling people's minds...

Higher ISO values mean more grain/noise
ISO
The terms ISO and ASA are interchangeable. ISO is the more modern term and the one that should be used, apologies in advance if I sometimes write ASA. It's what I grew up using.
I will include some more information about ISO (including how to say "ISO") at the bottom of this page.
ISO is a description of how sensitive your film is to receiving light. 100 ISO film is half as sensitive as 200 ISO film which is half as sensitive as 400 ISO film. The same is kind of true for a digital camera sensor. The digital sensor has one sensitivity level but will record the image lighter or darker according to the selected setting. Basically it behaves as if its sensitivity to light is responding when you alter the ISO rating.
So, an ISO setting of 200 will require half the amount of light as a setting of 100 ISO to achieve the same exposure value. In low light settings you will need a higher ISO in order to obtain correct exposure. The trade off is that higher ISO ratings introduce more grain in the case of film and more noise in the case of digital and, also suffer from a slight reduction in dynamic range. To be fair, most modern digital cameras do a good job of managing noise until you really push the ISO towards the extremes.
Increasing the ISO one stop (e.g. ISO 100 to ISO 200) effectively doubles the light sensitivity of the sensor by brightening the image by one stop.
ISO is not a creative consideration when making a photograph. A good analogy for ISO is the volume control on a radio. There are two things that determine the strength of the radio station's broadcast signal: the power output of the transmitter and the distance you are from that transmitter. You can turn the volume control up or down to make it louder or quieter but it has absolutely no effect on the strength of the actual broadcast signal.
Shutter speed and f-stop determine the exposure, changing the ISO can make that exposure possible.
Digital photographers... always use the lowest ISO that you can, increase the ISO when necessary to achieve the desired exposure value. Film photographers... load the right film for the situation, or learn to push/pull your exposure - a subject for another time.
These days most digital cameras have an auto-ISO function. I strongly recommend that you do not use this feature.
ISO Stops: 50 - 100 - 200 - 400 - 800 - 1600...

Use shutter speed to control how movement appears
SHUTTER SPEED
The shutter speed is the amount of time the shutter is open. The longer the shutter is open the more light reaches the film/sensor. Use high shutter speeds to freeze motion, slower speeds to create blur.
Increasing the shutter speed by one stop halves the amount of light that reaches the sensor. The slowest "safe" shutter speed to hand hold a camera for most people (without using VR or image stabilisation) is roughly the inverse of the lens's focal length. For example, a 50mm lens would allow you to hand hold the camera at a shutter speed of around 1/50th of a second, 100mm - 1/100th.
To freeze motion, faster moving subjects require faster shutter speeds. E.g. a person waving their hand could be captured at around 1/125th, freezing a professional golfer mid swing around 1/1000th, stopping the wings of a hummingbird - up to 1/8000th.
Shutter stops:
1/8000, 1/4000, 1/2000, 1/1000, 1/500 - good light, freezes motion
1/250, 1/125, 1/60 - good for people, stationary things
1/30, 1/15, 1/8, 1/4, 1/2, 1 sec, 2 sec, 4 sec, 8 sec, 15 sec, 30 sec, bulb, timer - to create blur, low light, panning (you're going to need a tripod or something to hold the camera)
If you are photographing sport or wildlife use a faster shutter.
If you want the water flowing down a waterfall to appear creamy you'll need the shutter open for at least a few seconds.
Note: I mentioned the Law of Reciprocity earlier, the longer that film is exposed to light the less sensitive it becomes to receiving light. This is known as Reciprocity Failure. Reciprocity failure can occur in film with exposures longer than around one second. A longer exposure time needs to be calculated to compensate, the amount of additional exposure time varies from film to film. When you purchase film it will include a datasheet explaining how to compensate for reciprocity failure.
Digital camera sensors have a different problem with long exposure times. Long exposures can cause the sensor to overheat adding noise to the photograph. There is no way to prevent this other than taking multiple exposures and stacking them using software. Most modern cameras will detect severe overheating and shut down before any damage occurs; it would need to be a very long exposure in very hot weather for that to occur.
Use aperture to control depth of field
APERTURE
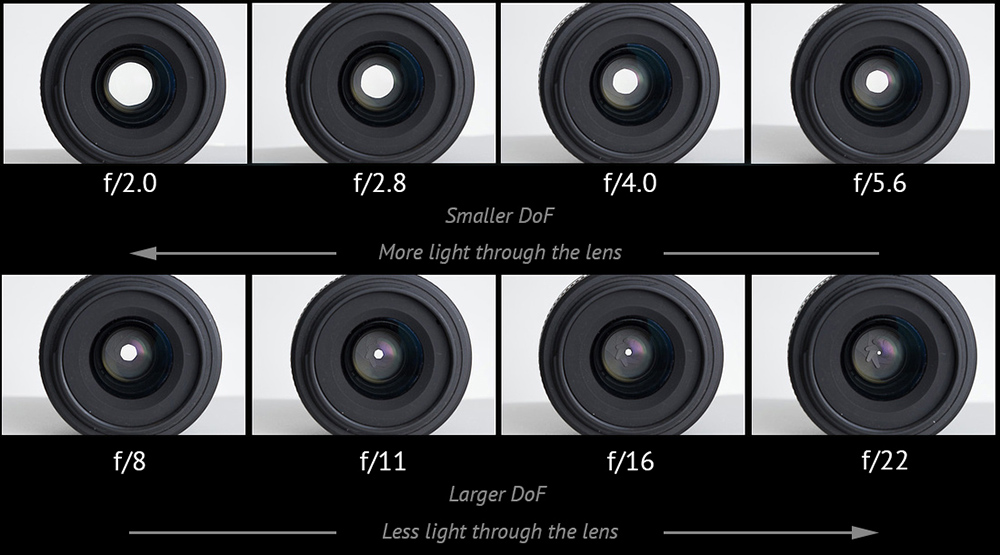
The aperture is the opening in the lens. A bigger opening allows more light to reach the sensor.
Aperture is measured in f stops, the lower the number the bigger the opening (to understand why, read my post "Why do smaller F-stop numbers indicate larger apertures?").
The opening in your lens is pretty close to a circle. Increasing the aperture one stop (e.g. f/4.0 to f/2.8) doubles the size of the circle - letting double the amount of light reach the sensor.
F stops: f/1.0, f/1.4, f/2.0, f/2.8, f/4.0, f/5.6, f/8, f/11, f/16, f/22, f/27, f/32, f/45
(each stop halves the size of the aperture)
The aperture you select has a direct effect on the Depth of Field (DoF) of the photograph. That is, how much of the photograph is in focus. A larger aperture (e.g. f/2.8) will have a smaller depth of field (less in focus) than a smaller aperture (e.g. f/11).
Often for portrait photos it is desirable to have your subject in focus and the background blurry - select a larger aperture, f/4 or bigger. There other factors that can affect the apparent depth of field but we'll go into those later.
Generally for landscape photos you will want as much of the image in acceptable focus as possible - choose a smaller aperture, anywhere from f/8 to f/11 will get you started.
If you are using a medium or large format camera be aware that you will be working with smaller apertures than you would with a 35mm camera. I will go into this in more detail in a post about "crop factor".
The International Organization for Standardization - More about ISO
The International Organization for Standardization is an organisation based, in Geneva, that develops and produces technical, industrial, and commercial standards. You may have encountered some of their work, such as ISO 9000 Quality Management, ISO 45000 Occupational Health and Safety, or ISO 13216 ISOFIX Child Seats for Cars, as a few common examples.
ISO 6 is the name for the family of standards they produced that refer to camera film speed. There are several different standards within this family, such as:
* ISO 6:1993 Photography: Black-and-white pictorial still camera negative film/process systems – Determination of ISO speed
* ISO 5800:1987 Photography: Colour negative films for still photography – Determination of ISO speed
* ISO 2240:2003 Photography: Colour reversal camera films – Determination of ISO speed
Digital camera ISO speed ratings are determined by a different standard :-
* ISO 12232:2019 Photography: Digital still cameras. Determination of exposure index, ISO speed ratings, standard output sensitivity, and recommended exposure index
What? So ISO is not an acronym or initialisation?
No, it's not. As the International Organization for Standardization has three official languages (English, French, Russian) the acronym would be different for each language. Not a very good example of "standards". The term "ISO" is actually a shortening of the Greek work "isos" which means "equal".
So there you go, the correct way to pronounce ISO is "eye-soh" - not I.S.O.
Recent Articles


Subscribe